 The freight carrier just delivered to you a skid of table tops and a skid of bases, so now what do you do? It looks like quite a bit of work and you don’t have a clue of how to set up your new tables efficiently. Continue reading and find out how to easily set up the tables and bases without hiring a contractor.
Step 1 – Gather Materials
Before the truck line arrives and delivers your table tops and bases, have these tools ready: extension cord, drill, extension bit (optional this is to hold Phillips bits), several #2 Phillips bits, a couple of soft blankets, measuring tape, some small drill bits, masking tape, black marker, pencil, a long about 4 feet straight edge (a piece of wood or a yard stick) and a piece of string about 6 feet long. These are common tools and with them you can assemble just about any table to its’ base.
At this point you may be asking why the manufacturer didn’t just ship my tables and bases already assembled. The answer is simple: money and damages. Money because assembled tables are more difficult to box and take up quite a bit more room in the truck, where the cost to ship goes way up. Second, if tables are set up prior to shipping, the odds of your tables and bases arriving undamaged are small in a common carrier. That’s a type of freight carrier where your tables and bases are mixed in with other people’s freight. Other than hiring the assembly to a carpenter or handyman, the most cost efficient way to assemble tables and bases is do it yourself. Now that you have accumulated the tools, and have accepted the freight, the first thing to do is be organized when opening the boxes, do not just scatter parts.
Step 2 – Prepare Installation Area
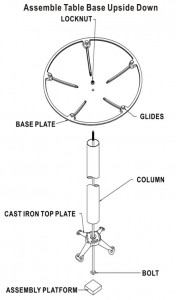
First, if you have the room, put all the granite or butcher block table tops near where they will end up, being careful not to scratch the tops, then assemble the bases per those instructions. Then put the restaurant table bases with the table top they are assigned to and now the bases and table tops are matched correctly together. You are now ready for the next step of putting the table tops together with the bases.
Put your soft blanket on the floor and put the finished side of the table down. Now you will need to find out where the base should go on the bottom of the table. Most all bases are going to have a 3” or 4” column and the center of that column matches is where the table bottom should be marked. If you are using the cross style table bases, you can point the base legs to the corners or sides of the table. Consider what position you think is more comfortable for your customers.
Step 3 – Prepare Tables and Bases
Square tables – Take your straight edge and marker, draw a line from one corner to the opposite corner and where they intersect is where the center of the column should be placed. There is a plate that attaches to the table bottom called a spider, and the plate can be square plate or one with 4 or more arms. Use the lines you made on the table bottom to get this plate centered.
Rectangular tables – Treat them like the square tables. Sometimes you will have a rectangular table top that takes two bases. Generally 12” to 15” from both edges of the table is where to center those columns. Set the two bases on the table bottom and set the distance from the edge at 12” but adjust the distance slightly depending on how the base-table top relationship looks to you and the comfort you want for your customers. You might be surprised at all the specific situations tables are used, so that is why there is a range of placing the bases rather than an exact measurement.
Round tables – Finding the center is a little more tricky on round tables, but not difficult. This is where you use your string and pencil. Tie the string around the pencil and the string’s length should be one half of the diameter. For example, if your table is 36” in diameter mark the string, but don’t cut it at 18”. Hold the string with the 18” mark at the edge of the table and make a small arc about 6” long in the center of the table. Pick several other random points at the edge of the table and make the same arc. Where all these arcs cross is the center of the table. Draw a line about 15” or so through the center and make another line perpendicular (you can use the square edge of a piece of cardboard) to it also about 15” long. Now you have the center of the table marked just like the square or rectangular table tops. Fore more detailed information, read our instructions on finding the center of a round table.
Step 4 – Drill Tables and Attach Bases
Drilling the screws into the table top is final step. With restaurant butcher block tables, the holes will need to be pre-drilled, so if the bases are placed where you want them on the bottom of the table (remember the top of the table is still on the blanket facing the floor) mark the spots where the screws will attach and the base so it is put back in the same spot. Remove the base or bases from the table bottom. The drill bit to pre-drill the holes should be smaller than the shaft of the Phillips screws you are using. If the screws are 1” long and the table top is 1 ½” then put a piece of masking tape about 1” away from the tip of the drill bit. This will let you know where to stop drilling because you don’t want to drill through the table top. Once the holes have been pre-drilled in the table, you can return the bases to the position where you marked the holes and use the drill, extension and Phillips bits to secure the bases to the tops.
Putting screws into granite restaurant tables is the same as the butcher block, except the bottom is typically plywood, so after marking where the column goes, place the bases on the table, then you can then just use the drill to screw in the Phillips screws. Now simply have two people turn the tables upright on the installed bases. Take a minute to adjust the levelers and wipe the table top down. You are now ready to serve your customers on your restaurant’s brand new tables and bases.
